Shipment Provider Setup
Contents
- 1 Objective
- 2 Global Setup of Shipment Providers
- 3 Synchronization of Shipment Provider from Shop Backend System
- 4 Shipment Provider Used for Certain Payment Methods
- 5 Validation of Tracking Code via Regular Expressions
- 6 Pre-Assignment of Shipment Provider for Orders
- 7 Limit Selectable Shipment Providers Based on Customer Location
Objective
Shipment providers are required for order processing. Therefore, it is necessary to set up all available shipment providers carefully.
- Seller Center supports multiple options for the additional configuration of shipment providers.
Shipment Type Explanations
Seller Center supports three different order flows based on the shipment type that is configured for a Seller.
These shipment types are:
- “Drop shipping”
- “Cross-docking”
- “Fulfillment by Venture (Consignment)”
When orders of type “Cross-docking” are imported to Seller Center, it can happen that the warehouse address from the Venture is displayed instead of the the shipping address from the customer.
{“first”:“”,“last”:“”,“address”:“warehouse address”,“city”:“City”,“postcode”:“00000”,“country”:“Germany”}
Global Setup of Shipment Providers
All general settings can be configured under Administration > Settings
| Step | Description | Image |
| 1 | Go to Administration > Settings | |
| 2 |
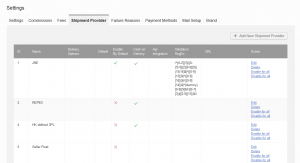
Overview of all available shipment providers
|
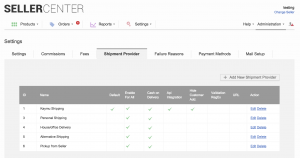
|
| 3 |
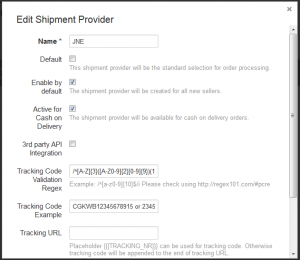
Add a new shipment provider or edit an existing one.
|
|
The following fields can be edited:
| Column | Explanation |
| Name | Shipment provider name. This must be the same as in OMS/WMS. |
| Default | Sets a particular shipment provider as the default to be used by Sellers. It will be pre-selected. |
| Enable for all | Automatically enables a new shipment provider for all Sellers. |
| Cash on Delivery | Some shipment providers allow customers to immediately pay on delivery for an item. If the shipment provider does not support this service, the Seller will not see this shipment provider while shipping their products. |
| Tracking Code Mandatory On |
“Ready to ship”: can be used with or without external integration or OMS integration “Shipped”: can be set only in combination with OMS integration. Setting a tracking code on status “Shipped” cannot be supported in the mobile application.
In order to be able to use the feature, API calls (setStatusToReadyToShipV2 and setStatusToShippedV3) should be developed on OMS-side.
Critical KnowledgeIf you want to enable the setting of a tracking code on “Shipped,” please raise a TMLSD ticket. The parameter that needs to be enabled is tracking_code/on_shipped_status/enabled.
|
| Third Party API Integration | Select this option if the OMS/WMS has a working API for receiving tracking codes directly from the shipment provider. When selected, the Seller doesn’t need to enter a tracking code themselves. |
| Hide Customer Address Information |
Hides shipping and billing address of a customer in order details, export, and documents when an order comes into Seller Center. The Seller can’t see the customer address and make the delivery themselves. Additionally, an option in the maintenance configuration allows you to block the address for an order without any shipment provider. Once the order has a shipment provider assigned, “Hide Customer Address Information” settings will be applied.
Critical KnowledgeIf you want to hide the address for an order without a shipment provider, please raise a TMLSD ticket. The parameter that needs to be enabled is order/hide_buyer_info/if_no_shipping_provider_set/enabled.
|
| Hide Customer Phone Number |
Hides customer phone number in order details, export, and documents when an order comes into Seller Center. The Seller won’t be able to contact the customer. Additionally, an option in the maintenance configuration allows you to hide the phone number for an order without a shipment provider. Once the order has a shipment provider assigned, “Hide Customer Phone Number” settings will be applied.
Critical KnowledgeIf you want to hide the address for an order without a shipment provider, please raise a TMLSD ticket. The parameter that needs to be enabled is order/hide_buyer_phone/enabled.
If an order is of type “Cross-docking,” the phone number is not displayed because the warehouse address is used as delivery address. Since the warehouse address does not contain a phone number field, it will not be printed in the document templates. |
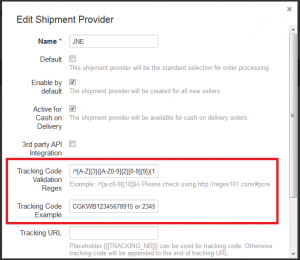
| Tracking Code Validation Reg-Ex | Regular expression setup to validate tracking codes entered by customers. Please read below. |
| Tracking Code Example | Gives Sellers information on what a tracking code should look like. |
| Tracking URL |
Defines the tracking URL for orders. Will be displayed in the Order Overview page, as well as in order detail and order export. The tracking URL uses a base URL that the tracking code can be attached to. If only the tracking URL is given, the tracking number will be attached at the end. Sometimes it is necessary to place the tracking number somewhere in the middle. To set this up, please use the pattern {{{TRACKING_NR}}}. Example: https://shipment-provider-url.com/?code={{{TRACKING_NR}}}&something_else Resulting URL: https://DHL.com/?code=123567788&ship |
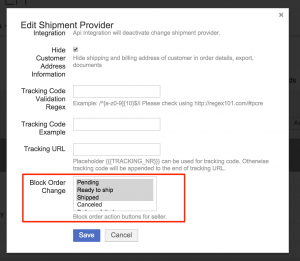
| Block Order Change |
For some shipment providers, certain order status change is only allowed for admins or dispatcher user, but not for the Seller-related user.
Critical KnowledgeIf you want to enable the feature for blocking certain order statuses for a specific shipment provider, please raise a TMLSD ticket. The configuration that needs to be changed is order/block_order_states/feature_switch_enabled.
In Seller Center, some statuses are already blocked and hidden for all users and all shipment providers. This hidden setting overwrites the specific shipment provider configuration. Possible order states which can be blocked:
In order to change this global configuration of blocked order statuses, please raise a TMLSD ticket and indicate which order statuses should be removed from the list of available actions. The configuration that needs to be updated is order/blocked_states.
|
| Tracking Code Mandatory On | Option to choose at which step the tracking code is required. Per default, it is set at “Ready to ship” status. However, it is possible to change this to “Shipped” status. |
| Third Party Integration | This setting is available when Seller Center should be directly communicating with a shipment provider to receive tracking codes instead of receiving them from the Order System. More information can be found here. |
| OMS Integration | This setting is in place when there is an API connection available to receive order tracking codes from the Order System for order management. |
| Digital Type | Defines whether or not this configured shipment provider should be used for digital goods. More information can be found under Digital Goods. |
| Pick Fee | Triggers a pick-up fee for this shipment provider if the according fee is also enabled. For Fee Setup, please read the linked article. |
Seller Setup of Shipment Providers
In Seller Center, the configuration of a shipment provider can also be done on the Seller-level. The Seller-based shipment provider can be configured based on the setup of the global shipment provider.
Synchronization of Shipment Provider from Shop Backend System
To enable shipment provider information to be received directly from the Shop backend system, go to Administration > Settings > Order Management and then to the setting “Shipping provider configuration push from the Shop”
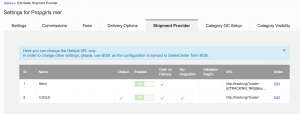
- If sync from Shop backend system for Seller shipping settings is enabled, then the changes in Seller Center will be locked.
- In order to make changes to the configuration, the Shop backend system has to be used.
- Only the “Default” configuration can be set in Seller Center.
- Technical documentation can be found here.
| When all changes are synced from the Shop, the user will see the display on the left. |
|
Shipment Provider Used for Certain Payment Methods
In many countries, it is typical for the customer to pay the shipment provider for their products immediately once the order is delivered. To ensure that the shipment provider supports such a service, certain settings need to be set up in Seller Center.
- First, the payment methods need to be set up properly. For further information, please read the chapter Payment Methods.
Configuration for Document Templates
The document templates for invoice or shipping label need to be adapted accordingly.
- These need to display that a certain amount of money is to be collected from the customer.
For further information about document templates and how they are set up, please read the chapter for Template Setup.
To inform the shipping provider that they need to collect payment from the customer when they deliver the package, a notice is required on the shipping label.
- Choose a visibly prominent place on the shipping label to indicate that the currier is required to collect payment.
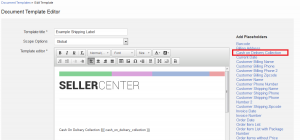
- Use the placeholder for “Cash on Delivery Collection”
- Click on it, and it will appear in the editor page:
This value will be only be filled if “Cash on Delivery” has been selected as the payment method. Otherwise, the value will be filled with “0”
Validation of Tracking Code via Regular Expressions
Tracking Code Validation Regex provides the option to validate the tracking code entered at the time of shipping using the regex function.
/^ and $/
By default, they are case sensitive.
Here are some examples:
| Example Expression | Possible Content |
| /1{8}$/ | A range from 0 – 9 characters can be entered. Only eight characters in total will be accepted. |
| /2{5,10}$/ | Characters with “a,” ”b,” or “c” will be accepted. Only 5-10 characters in total can be entered. |
| /3{5,10}$/i | Same as above, but not case sensitive. Capital and lowercase letters will be accepted. |
| /4{12}$/ |
Characters from “A” to “Z” can be entered, as well as numerical values from 0-9 . In total, only twelve digits can be entered |
| /5{12}$/ |
Same as above; however, special characters (Ü, %, or _) can also be entered. If a dash (-) is needed, this should be at the end of the list of the special characters to avoid confusion while processing. |
Tracking Code Example:
Pre-Assignment of Shipment Provider for Orders
- As a Venture, I want to send a shipment provider to Seller Center via API so that a Seller can use it automatically for order processing.
- As a Venture, I want to configure whether the assigned shipment provider should be used or can be ignored based on Seller and global settings.
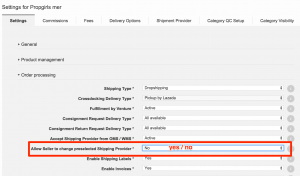
- As a Venture, I want to decide if a Seller can change the received pre-selected shipping provider during order processing.
- OMS sends shipment provider information.
- Potentially inaccurate shipment provider assignments can be ignored.
- Functionality not supported for LINIO. By default, the shipment provider will be accepted
- Setting is available on global and Seller-level.
If the setting for “Accept Shipping Provider from OMS/WMS” is set to “active” under Administration > Settings > Order Management, this means that when an order is received, the order information for shipment provider will be saved in Seller Center. Otherwise (if it is set to “inactive”), any provided value will be ignored.
Skipping of Shipment Provider Selection during Order Processing
Precondition: Setting for “Accept Shipping Provider from OMS/WMS” should be set to “active”
Limit Selectable Shipment Providers Based on Customer Location
Please refer to the following article (Limit Shipping Provider options to specific customer location) if you’d like to limit the available shipment provider on certain conditions (e.g., customer location or shipment type).
