Attribute Setup
Objective
The Attribute Setup feature creates the best product creation experience for the Seller by guaranteeing that all the values required for product creation are passed from the Seller to the system.
Attributes help Sellers describe their products and allow customers to visualize products with all their functionalities. This makes the purchase decisions easier.
Attribute Setup
| Step | Description | Image |
| 1 | Go to Administration > Attribute Set Editor | |
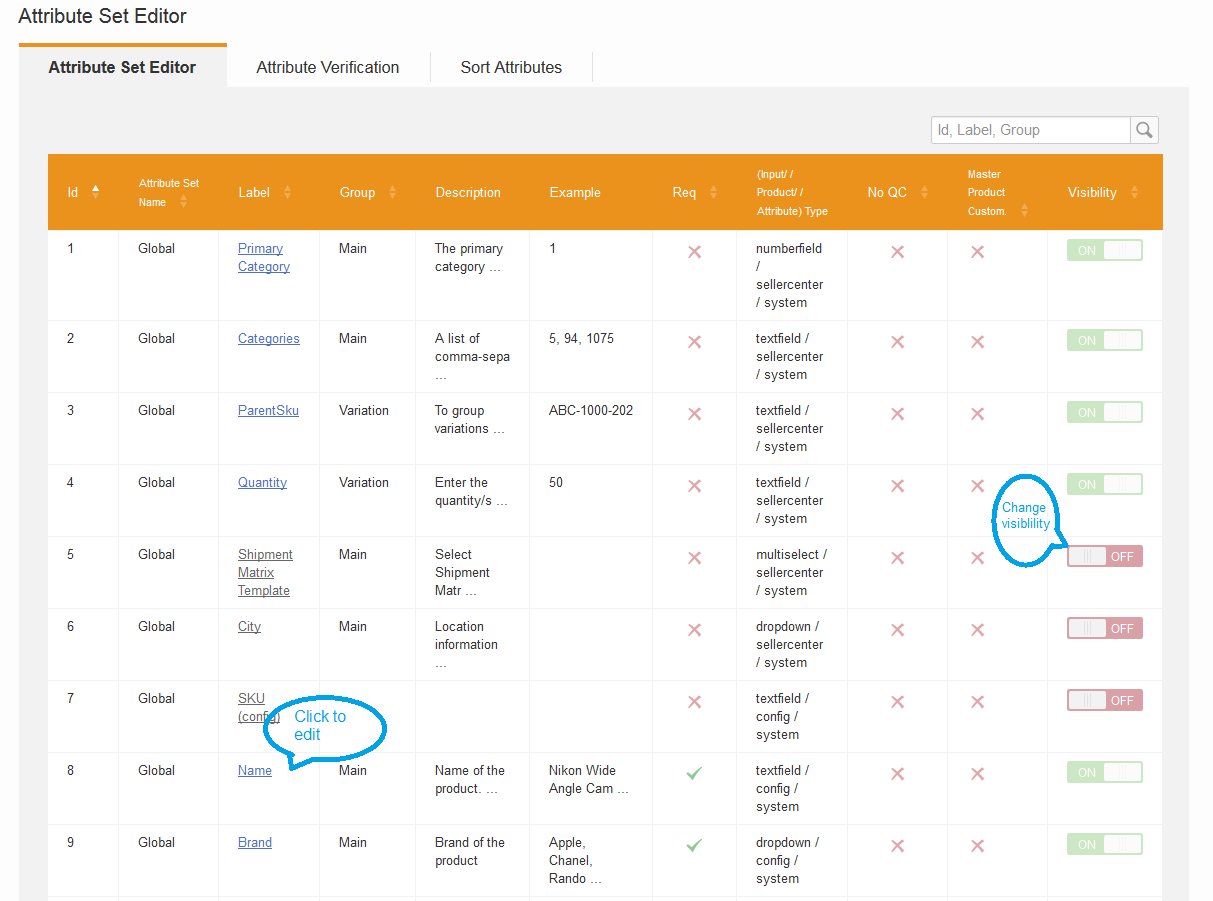
| 2 |
This page shows an overview of all available attributes that exist in the system.
|
|
| 3 |
On this overview page, the visibility of attributes can be changed.
|
|
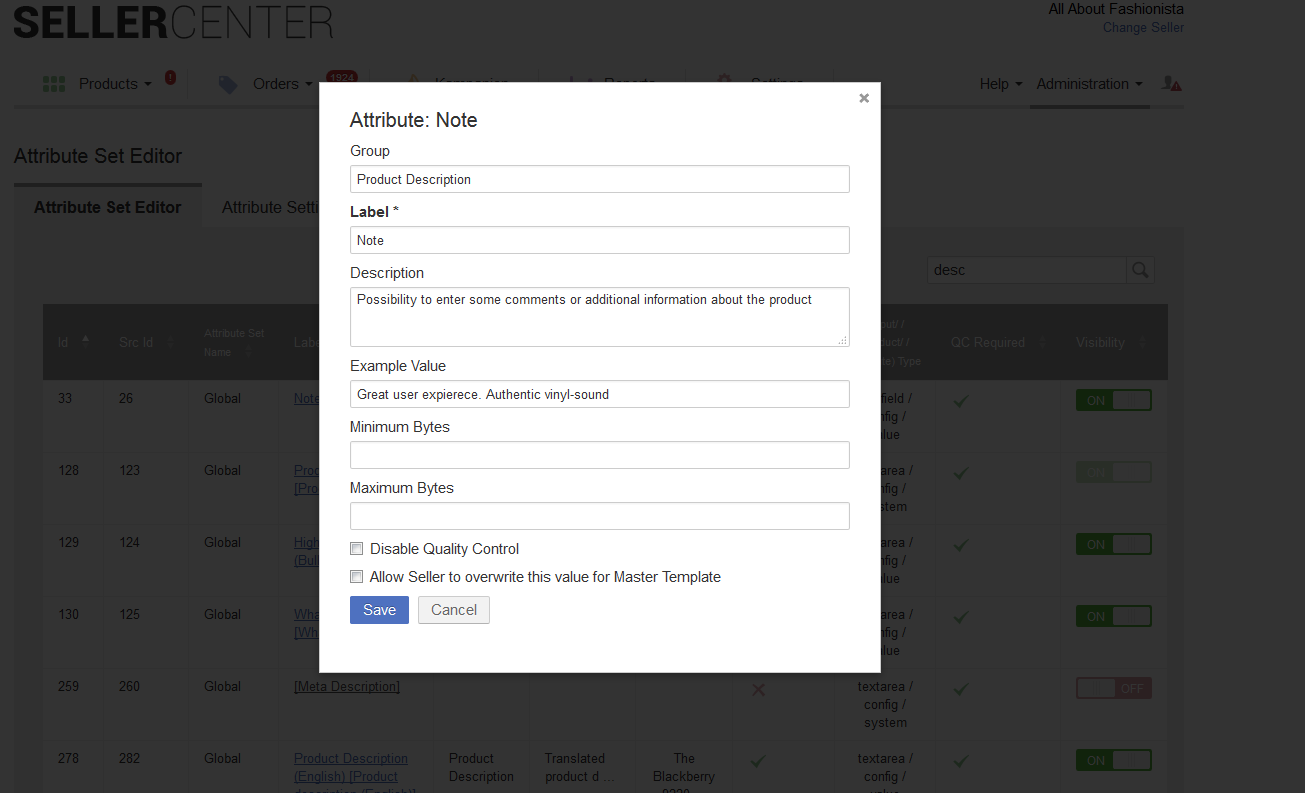
| 4 | To edit an attribute, simply click on the attribute name. An overlay will open in which all editable fields can be changed. |
Explanation of Attribute Table
| Column | Information | Editable |
| ID | ID for the attribute within Seller Center | No |
| Src ID | ID for the attribute within the Shop system. Attributes that don’t have this field filled are required for Seller Center operation. | No |
| Attribute Set Name |
Attribute set that the attribute belongs to according to the Shop settings in the attribute editor. “Global” means that this attribute is available for all attribute sets. |
No |
| Label | Name of the attribute that is displayed to the Seller | Yes |
| Group |
Sections in which attributes are grouped. Possible groups:
It is possible to use other group names as well. Anything can be chosen apart from “Main,” “Price & Tax,” and “Variation” |
Yes |
| Description | Short description to tell Sellers the attribute’s purpose. | Yes |
| Example | An example (number or text) to help Sellers understand the attribute’s purpose | Yes |
| Required |
Indicates if an attribute is required (mandatory) during product creation.
Seller Center is not able to change this configuration. This setting is synced from the Shop system to Seller Center. If it needs to be changed, please contact admins of the Shop system to change it. After 30 minutes, the change will be available in Seller Center.
|
No |
| (Input/ Product/Attribute) Type | Input product attribute type cannot be changed since it is defined in the Shop backend. | No |
| No Quality Control |
Indicates if an attribute requires a quality control check. If the attribute has a green tick (✔), it means that whenever only this attribute is edited, no quality control is required because the product will be automatically pushed to the Shop and updated there. However, if the attribute is edited in combination with other attributes in a product, the entire product needs to be approved before it will be synced to the Shop. |
Yes |
| Visibility | Option to set the attribute to visible or invisible. | Yes |
Explanation of Edit Options
| Field | Explanation |
| Group | Section in which attributes are grouped |
| Label | Name of the attribute. This is how it is displayed to the Seller. |
| Description | Short explanation of the attribute’s purpose |
| Feed Name | Defines the name of the attribute for CSV and API import. Usually this name is based on the unique name within the Shop system. |
| Example Value | Example value to help Sellers understand the purpose of the attribute |
| Formula | Enter here the (feed) names of other attributes that should be used to calculate a certain value for this particular attribute. This attribute will not be editable in the product form, as it is automatically filled based on the calculation of the provided attributes in the formula. Further information can be found here. |
| Minimum Bytes | Minimum character input for this attribute. For example, Sellers have to put in at least six (6) characters for the attribute before they are able to save the product. |
| Disable Quality Control |
Indicates if an attribute requires a quality control check.
Setting the flag for “Disable Quality Control, will not have any effect on the attributes “Price” or “Sale/Special Price.” In order to disable price changes, please read this article.
|
| Allow Seller to Overwrite this Value for Master Products | This check indicates if the Seller is allowed to overwrite the value entered for the master template. |
|
|
Option to edit on the Quality Control Overview. Further information can be found here. |
|
|
Add attribute to the Order Overview export. |
| Don’t allow 0 or NULL value | Once this field is checked, the attribute must be filled with a value. Zero (0) is not allowed. |
| Enable Blacklist Check | Once checked, this attribute is compared against the configured list for blacklisted keywords. Further information can be found here. |
Fixed Values
For certain attributes, a default value should be sent to the Shop system because the Seller should not be able to edit these attributes. These attributes can be used for business intelligence reporting or just for product creation in the Shop. A fixed value can be set up for all attributes not visible to the Seller.
In order to set the fixed value, the attribute needs to be set to invisible. Otherwise, users can actively change the value.
If the attribute is a mandatory attribute, the fixed value is automatically pushed to the Shop system. If the attribute is not mandatory, we in Seller Center need to “force” the sync of such attributes. To do this, we need the attribute ID (from Seller Center) of the attribute, and we need to add this ID to the configuration parameter in the maintenance section for the parameter:
product/attributes/fixed_attribute_ids

The fixed value can be configured in the following ways:
Textfield: Any text can be inserted. Please send Seller Center team the desired text
Dropdown/Selectbox: Send Seller Center team the database ID from the Shop of the option to be sent.
Checkbox/Multiselect: Send Seller Center team the database ID from the Shop of the option to be sent.
Preconditions for Setup within Shop System
The Shop system is the creator and owner of attributes, categories, brands, etc. This means that Seller Center regularly checks for updates. To read how the sync of attributes, categories, and brands work, please read this chapter.
Attributes need to be configured in a particular way to ensure they can be properly used in Seller Center after they are activated.
General guidelines:
- Attribute needs to have the inputMode set to “edit” or “edit_on_create” if this attribute should be filled by Seller for the product.
- maxLength needs to be set with a value > 0 so that the Seller is able to add content for the attribute. This is especially necessary for textfields, number fields, or textareas.
- decimalPlaces defines the decimal part of numbers. If input of decimal numbers is allowed, the value needs to be configured with a number > 0.
-
Size/variation attribute needs to have a uniqueValue configured.
- For setup in the Attribute Editor (see above), the feed name needs to be configured, as there might be issues with using “Variation” or “Size”
Sort Attributes
In addition to enabling/disabling attributes for Sellers, attributes can be dragged and dropped in the “Sort Attributes” tab to reorder them within each group.
This provides a logical flow when filling out product content.

Frequently Asked Questions
This setting can’t be changed in Seller Center. This is only possible via the Shop system since Seller Center syncs the configuration from there. Please get in contact with an admin on the Shop system-side.
- Is the attribute part of the global attributes or part of a specific attribute set? If it is a global attribute, please proceed with step 4; otherwise, go to step 2.
- Please check under Administration > Attribute Set Editor > Category Attribute Configuration. All categories are listed there.
- Export the corresponding category to check whether or not the attribute is set to “Visible.” Further information can be found here.
-
If step 3 was unsuccessful or the attribute is a global attribute, a different setting needs to be checked. For this, please create a TMLSD ticket and have the Rocket Labs Service Desk check the config parameter order/attributes/ignore_create_attributes for the missing attribute. Please also add the attribute name. The attribute should be removed from this list, since it prevents it from appearing on the product form.
- Go to Administration > Attribute Setup
- Search for the attribute.
- Click on the name and check in the overlay if the fixed value is set correctly (e.g., correct type, correct content).
- Save if changes were made.
- Set the attribute to invisible.
-
Is the attribute mandatory? (see required flag in the table)
- Yes: attribute will be automatically sent to the Shop system whenever there is a product update.
-
No: please copy the Seller Center ID of the attribute. A Rocket Labs Service Desk employee needs to go to Maintenance > Configuration Parameter
- Search for the config parameter product/attributes/fixed_attribute_ids
- Edit the parameter.
- Add the copied ID to the list. The attribute ID is the ID of Seller Center database, not the one from the Shop system.
- Save the change.
As a Venture, we only want to allow one variation or size per product. This prevents Sellers from creating additional variations for the same product. Additionally, the Seller should be also prevented from setting a variation value (e.g., “One Size,” or “No Size”). This ensures that the catalog stays uniform.
Some changes to the database need to be done on the Shop system-side:
-
For the variation attribute, set the following values:
-
product_type = simple
-
unique_value = global / not set
-
These variation attributes need to be invisible in the Attribute Set editor within Seller Center. This prevents the column for variation from appearing. Accordingly, this prevents Sellers from creating other variations for this particular product.

Once these changes have been made, it takes a few minutes to be applied to the products.
It is only recommended to use this functionality for specific attribute sets (e.g., watches or accessories) where a product is one of a kind. For apparel or shoes, variation attributes should be able to be created.